AI sports trainer
 Can AI help improve how you shoot a basket, throw a baseball, or swing a tennis racquet?
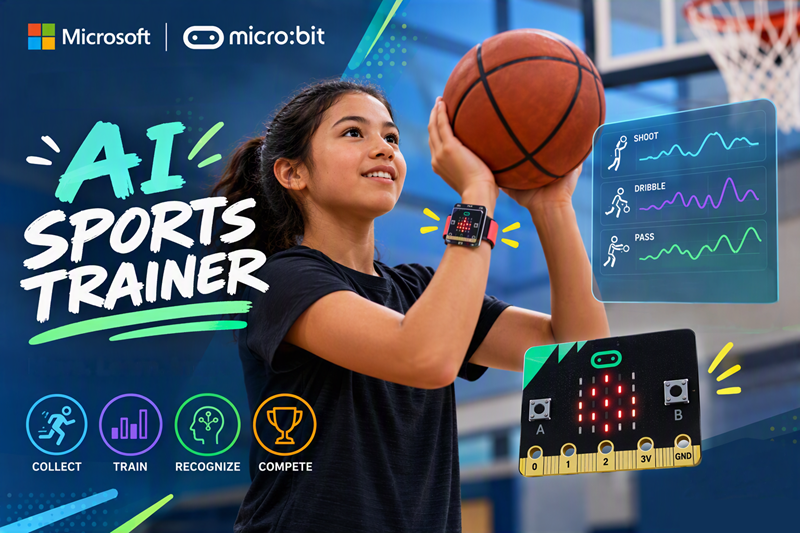
In this lesson, students will use a micro:bit to record sports movements, train a Machine Learning model, and then compete for points to see how accurate their AI models are at recognizing their movements.
Lesson overview
For: grades 6-10, students working in pairs
Time: 1 hour
Materials:
- one micro:bit, micro-USB cable, and battery pack for each student pair
- a wristband or way to attach the micro:bit (optional)
- sports equipment (like racquets, balls, etc.)
- space to move around
Recommended kits:
Technology Requirements:
- A desktop, laptop, or Chromebook running Chrome or Edge browsers, with access to the micro:bit CreateAI website
- Bluetooth enabled on the device for collecting movement data. Note: if Bluetooth is unavailable, you can use a second micro:bit connected by USB as the radio-link bridge.
Educator Resources:
Learning Outcomes:
By the end of this lesson, students will be able to:
- Understand what Artificial Intelligence refers to.
- Understand at a high level how Machine Learning works and the Machine Learning process.
- Describe what an accelerometer measures.
- Collect accelerometer data with the micro:bit.
- Train, test, and improve a machine learning model.
- Combine learned recognition with explicit rules in a program.
- Understand how ML models are only as good as the data they are trained on.
CSTA Standards Alignment:
- MS-ALG-ML-06: Hypothesize how a machine learning model generates classifications or predictions.
- MS-ALG-ML-07: Investigate ways to improve the accuracy of a machine learning model and reduce bias by refining the quality of examples and nonexamples in the training data.
- MS-ALG-ML-08: Evaluate the features and limitations of a machine learning model.
- MS-PRO-TR-19: Use systematic strategies to test, refine, and document changes to a computing technology to meet the intended purpose.
- MS-DAT-DC-24: Analyze options to address a data quality issue.
- MS-DAT-DI-25: Use a computational tool to identify relationships among variables in a dataset and make a classification or prediction.
Suggested curriculum tie-in:
- Physical Education
- Data Science and Math
- Physics
Educator preparation
Prior to the lesson:
- Read through this lesson guide, review the Educator Resources linked above.
- Decide how to assign student pairs:
- One student should assume the role of the "athlete" who will be wearing the micro:bit sensor and performing the sports movements
- One student should assume the role of the "coach" who operates the computer and records observations.
- Encourage students to swap roles midway through.
- Download micro:bit Receiver code (Section 7 below) onto a Teacher micro:bit.
- Download student code (Section 6 below) onto another micro:bit and test interaction.
Pacing:
- Hoop Dreams (10)
- Intro AI and ML (10)
- Data collection (15)
- Training and testing (5)
- Programming (5)
- Teams competing (10)
- Reflection (5)
Key vocabulary:
- Artificial Intelligence (AI) - the ability of a computer or robot to appear to think and act like a human
- Machine Learning (ML) - a subset of AI that enables computers to learn from data
- ML model - an algorithm trained on data to recognize patterns and make predictions
- Sensor - a device that can measure environmental data
- Accelerometer - a sensor that measures motion along 3 axis
- Certainty or Confidence level - how certain or confident the ML model is at recognizing a pattern or making a prediction
1. Hoop Dreams
Hoop dreams: How a coach's vision for a high-tech basketball gym is inspiring kids to aim for the perfect shot
Read or listen to this article about Shoot 360, a company that's using real-time data and AI models to train young basketball players.
Discuss the following questions with the class or with your partner:
- How does Shoot 360 use technology and data to improve players' basketball shots?
- How is the basketball training facilities like a video game? Would these gamification features motivate you to practice? Why might these features encourage some students but discourage others?
- Why do you think Shoot 360 uses both technology and human coaches? What could a coach notice or help with that a computer might miss?
2. Artificial Intelligence and Machine Learning
At a very high level, the term "Artificial Intelligence" (AI) is used to describe computer systems, applications or robots that can produce output or behave in a way that mimics humans and human intelligence.
AI is a field of study in computer science that dates back to the 1950's with the first definition of AI as a computer that could pass the Turing Test. This was a test whereby if a computer could carry on a conversation with a human, and be indistinguishable from an actual human, then the machine could indeed "think" and be "artificially intelligent".
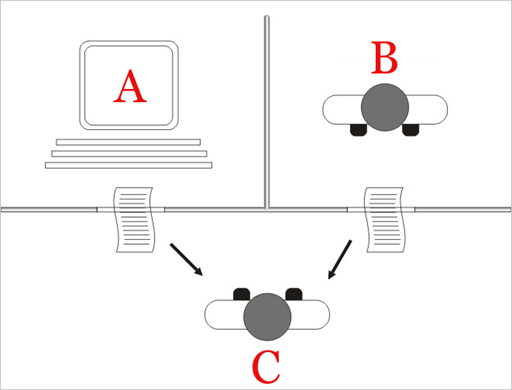
Turing Test
Discuss the following questions with the class or with your partner:
- What does it mean to 'think' like a human?
- What are some of the ways you've seen AI be helpful in your daily life? What do you use AI tools for?
- What are some ways you've seen AI can be harmful? Or have unintended consequences?
Machine Learning is an area of Artificial Intelligence that focuses on data-driven learning for AI models. Unlike traditional programming algorithms where you have to give the computer very specific step-by-step instructions to do something; in machine learning, the computer uses data and example patterns to infer what to do.
Making a Peanut Butter and Jelly Sandwich is the canonical example for rule-based algorithms - which is like a recipe where you have to tell the computer exactly what to do using step-by-step instructions.
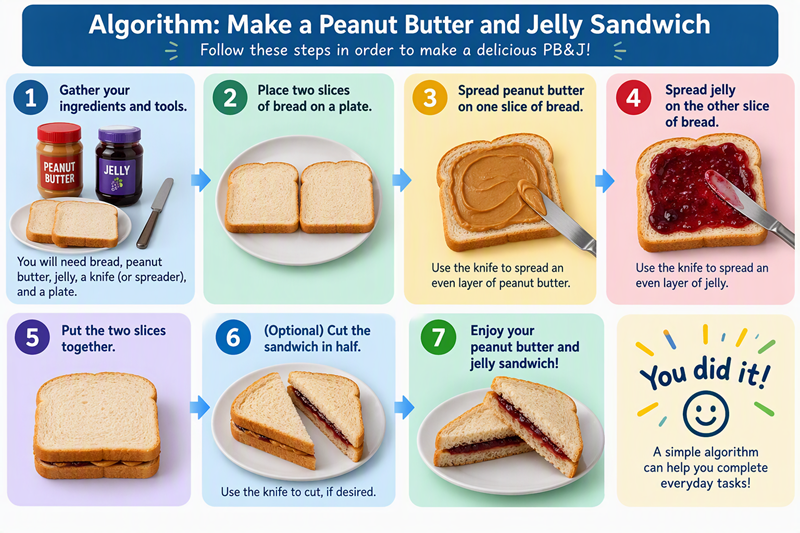
Peanut Butter and Jelly algorithm
In Machine Learning, the idea is that instead of a rule-based algorithm, you feed the computer a bunch of data - like different variations of peanut butter and jelly sandwiches, and examples of people making peanut butter and jelly sandwiches.
And instead of giving the computer explicit instructions, the computer can infer from the data what to do.
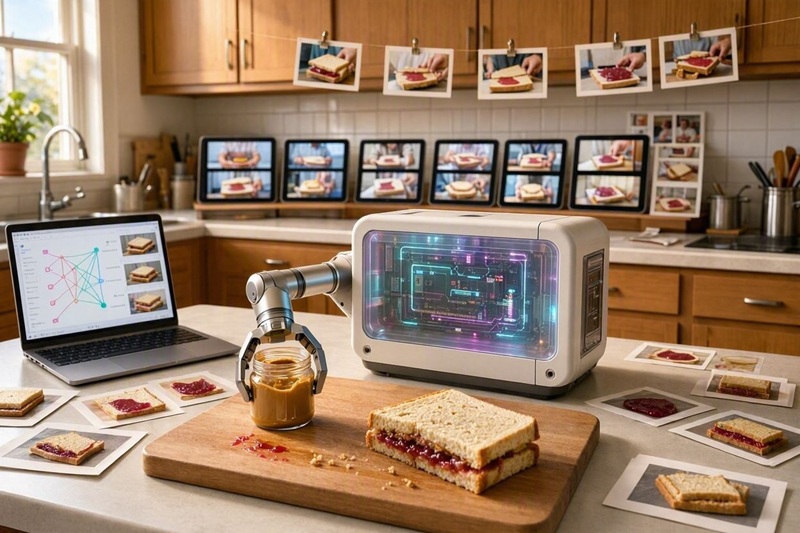
Peanut Butter and Jelly with Machine Learning
Process to create a Machine Learning model
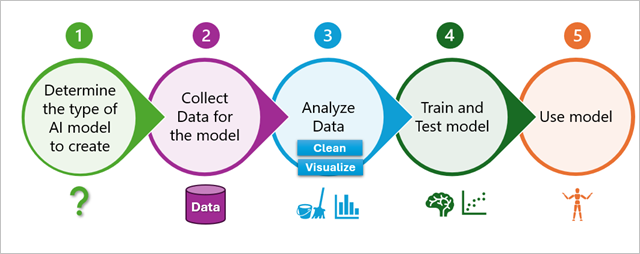
Machine Learning Process
A machine learning model is the result of training an algorithm on data so it can recognize patterns and then respond to new inputs based on these patterns.
The process for creating a machine learning model starts with determining the type of model you want to create - is it a Peanut Butter and Jelly Sandwich making model? Is it an English-Japanese language translator? Is it a car purchasing assistant? Whatever model you decide to create determines the type of data you will want to feed it.
The second step is to go out and source the data you need for your model.
The third step is to analyze the data you've collected. And part of that analysis may require cleaning the data to make sure you have a representative data sample and that there's no bias or bad data that will throw off the model. And visualizing the data also helps with understanding the data in your sample to make sure you have no outliers or anomalies.
The fourth step is training the model on the data and testing it. And in this step, you want to make sure the model is behaving the way you expect given the data. If it's not, then you want to go back and either give it more data, or make sure that the data it's trained on is accurate and representative.
And finally the fifth step is to actually use the model you created to perform a function - like making a 1000 PB&J sandwiches for your friends and neighbors!
A real-world example might be to create an AI driving assistant. We need to collect data about local traffic maps and weather. Then we need to analyze the data to make sure it's accurate and up-to-date. Then we should train and test our model using this data to make sure the recommendations it gives us are reasonable. If not, we may need to go back and make sure the data is up-to-date and accurate - because these models are only as good as their data. And then finally, we can use our AI driving assistant to ask what's the fastest and safest way to get home today, and hopefully it will respond with an optimal route.
3. Getting Started with CreateAI
Follow the instructions to get setup with CreateAI:
- Open a browser window to createai.microbit.org.
- Click to create a New project.
- Name your project "Sports Trainer" and click Create project.
- Click Connect and Next buttons.
- Using the USB cable, connect your micro:bit to your computer, then click Next.
- Click Next again, and then select the BBC micro:bit device in the browser dialog window and click Connect.
Now your micro:bit is connected to your browser window and the CreateAI data collection file will be copied over. This allows CreateAI to collect data from your micro:bit.
Note - if your micro:bit did not connect to your browser window and the data file was not copied over automatically, you can manually drag and drop or copy and paste the data-collection-program.hex file from your downloads folder to the MICROBIT drive on your computer.
Bluetooth Connection
To be able to send data from the micro:bit to your computer wirelessly, we need to setup a bluetooth connection.
- Disconnect your micro:bit from the USB cable.
- Connect a battery pack to your micro:bit and make sure the power switch is turned on (if there is a power switch).
- Click the Next button on your computer screen.
- Check to make sure the pattern of LED lights on your computer matches what's showing on your micro:bit device. If not, click on the green columns of lights on your computer to match the pattern you see on your micro:bit.
- Then click the Next button, and click Next again.
- In the browser dialog window that opens in the top left corner, select the BBC micro:bit device and click Pair.
Now your micro:bit is connected to your browser window wirelessly through web bluetooth.
4. Explore the accelerometer
Look at the Live data graph at the bottom of the screen while you move around your micro:bit.
The accelerometer, or the motion sensor, on the micro:bit measures acceleration along three axes:
- X-axis (red line) measures tilting left and right
- Y-axis (green line) measures tilting forward and backward
- Z-axis (blue line) measures moving up and down
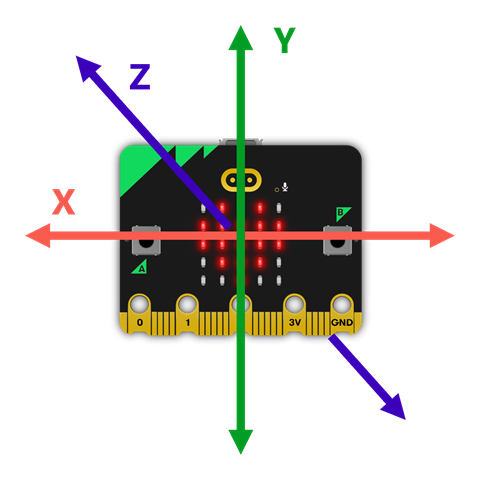
Accelerometer on the micro:bit
Try holding your micro:bit in one hand and doing the following:
- Keep your wrist relaxed and still for a few seconds. Can you detect any movement?
- Slowly tilt your hand left and right, then tilt it forward and back. Which lines move the most?
- Now try moving your whole hand straight up and down. Can you get the blue line to move?
- What happens when you jolt the micro:bit - like clapping, or banging on a surface?
5. Collect data for the model
To start, let's record a baseline gesture so our machine learning model can recognize when the micro:bit is still.
- Place the micro:bit on a table or flat surface and don't move it.
- Type in "still" as the name of the action on the CreateAI Data samples page.
- Choose an icon to display for when the micro:bit is still.
- Click on the 3 dots at the end of the Record button.
- And select Record for 10 seconds.
This will collect 10 different data samples (1 second each) of the micro:bit being still. All the lines for the accelerometer values should be flat.
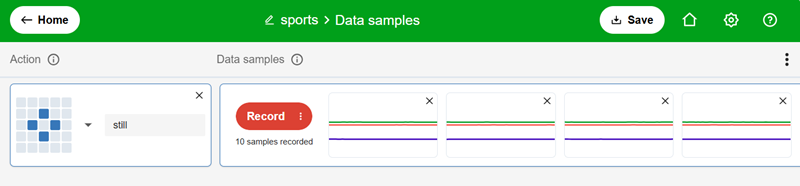
Data samples for when the micro:bit is still
6. Collect your sports training data samples
You and your partner should decide on 3 different sports movements to train your model to recognize. Things to keep in mind when deciding:
- How well can the micro:bit record the movement if it's attached to different parts of your body (wrist, ankle)?
- Is there the necessary space and equipment available to perform the movement safely?
- Can you record each gesture within a 1 second window?
Some examples -
- Basketball free throw
- Volleyball set
- Ping-pong paddle swing
- Cheer or dance move
- Soccer kick
Rehearse the movements. Make them distinct, comfortable, and reproducible. The "athlete" should be doing the sports movement while the "coach" should be operating and monitoring the data collection. The "athlete" should not move too far away from the computer or you will lose your bluetooth connection.
For each of the sports movements:
- Click on the Add action button.
- Type in a descriptive action label (like "ball toss").
- Choose a representative icon for the action.
- Record each movement separately, or as 10 samples/seconds in a row.
- Make sure to record at least 10 data samples.
- Visually inspect your data samples to ensure they are consistent.
Tips:
- Remove any accidental data samples - for example, data that was recorded between movements or before the movement started.
- You do not necessarily need to delete a data sample just because it looks slightly different: some variation helps the model handle real life movements.
- More data = more accurate models, record as many samples as you have time for!
By the end of this step, you should have 3 different sports movements as well as the "still" baseline action.
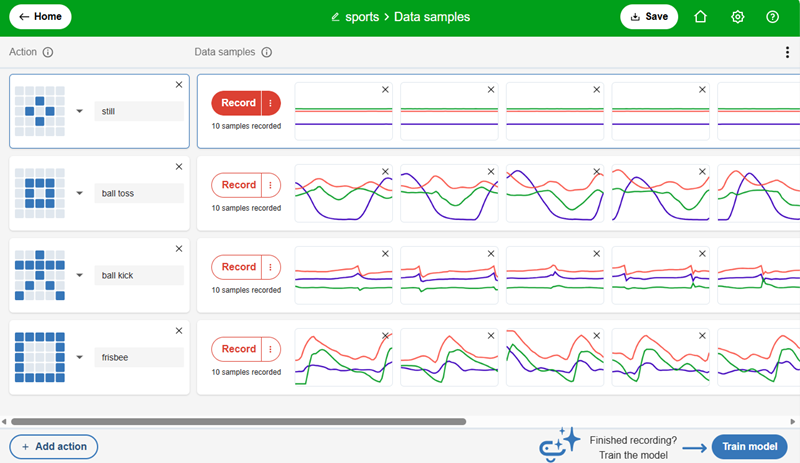
Data samples for 3 different sports movements
7. Train and test the model
Once you have all the data samples collected for your sports movements, the next step is to train your Machine Learning model using this data, so it will be able to recognize these movements in the future.
- Click on the Train model button in the bottom right of the screen.
- Then click Start training.
In the training screen, test your ML model's accuracy by moving the micro:bit to see if the model can correctly identify which sports movement you are doing.
- The Certainty level shows how certain or confident the ML model is that you are doing that movement.
- The Recognition point sets the certainty threshold for recognition of an action. You can set this yourself - the default is 80% recognition. The higher this value, the more exact your gestures must be.
- The Estimated action is what the model recognizes as the current movement you are making.
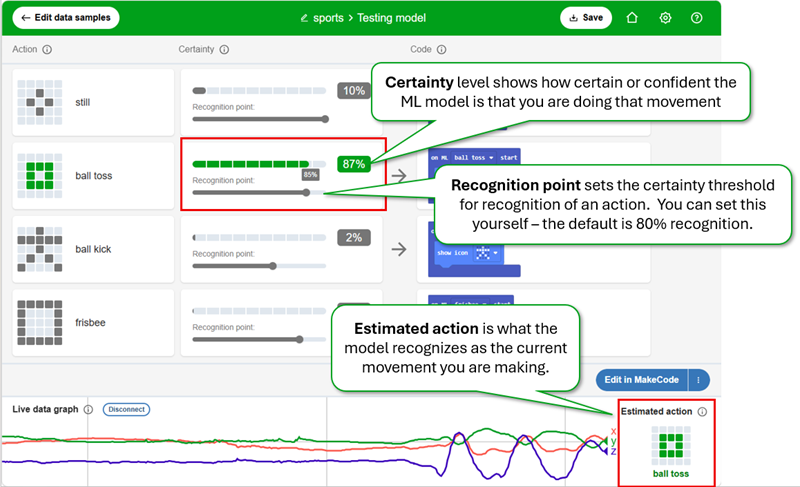
User interface elements of the training screen
- First, keep the micro:bit still. Does the model recognize "still" as the baseline action? With what percentage of certainty?
- Then try a mix of the 3 different sports movements one after the other and record your results in the table below.
The "athlete" should perform the actions while the "coach" records the results. Also be sure to document uncertain or unknown results.
| Trial |
Intended action |
Recognized action or unknown |
Recognition point |
Percentage Certainty |
| 1 |
still |
still |
80% |
100% |
| 2 |
____ |
____ |
____ |
____ |
| 3 |
____ |
____ |
____ |
____ |
| 4 |
____ |
____ |
____ |
____ |
| 5 |
____ |
____ |
____ |
____ |
Analyze data and Evaluate results
If the ML model is confused, or not recognizing your actions with a high degree of consistency or certainty, then you need to go back a step and edit your data samples.
- Click the Edit data samples button in the top left corner of the screen.
- Visually inspect the data samples collected for your sports actions and remove any data samples that may be throwing off your model.
- Record more data samples for the different sports actions. Try switching the "athlete" and "coach" roles - there may be some differences between how people perform different actions. A model trained only on one person's movement may work less well for someone else.
- Click on the Testing model button to re-train and re-test your model.
Educator checkpoint
Walk around the classroom and ask each student if their ML model was confused during testing, and if so, ask them to explain their improvement plan. Ask, "Whose movements are represented by the data? Who might be excluded? How might you make your model more inclusive?"
8. Use your model in a Sports Trainer program
Now let's use our model in a Sports Trainer MakeCode project.
1. From the CreateAI trainer screen, click on the Edit in MakeCode button.
This creates a project containing your model and its generated Machine Learning action blocks that will show a different icon when it recognizes the gesture.
2. In the MakeCode Toolbox, click on Extensions and type in thsparks/ai-gesture-extension into the search field
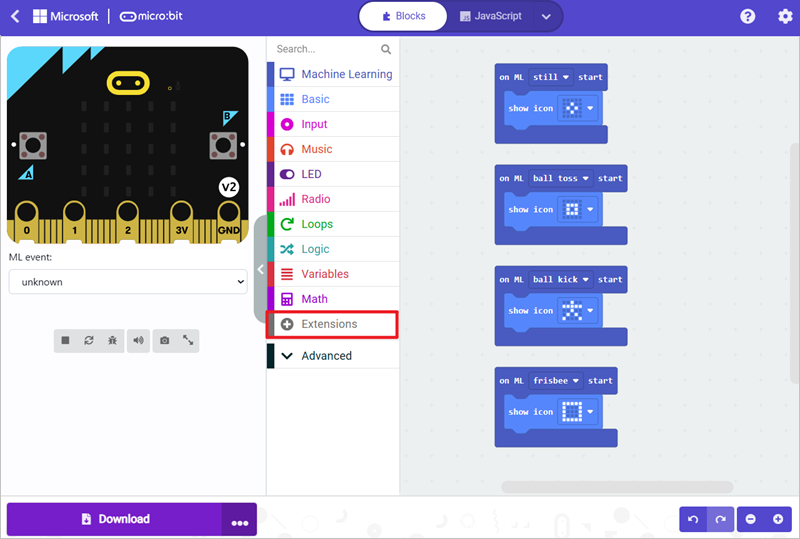
MakeCode project
3. Then click on the gesture-extension to add it to your project.
You will see a new category appear in your Toolbox called "AI Gestures" that includes a couple blocks which automate the sending of data to a receiver micro:bit. If you are curious how this extension works, you can look at the custom code here.
4. From the ||gesture_palooza:AI Gestures|| Toolbox category, drag out 3 ||gesture_palooza:send gesture|| blocks, and drop one each into the ||ml:on ML start|| events that represent your sports movements.
5. In each ||gesture_palooza:send gesture|| block, type the name of the action.
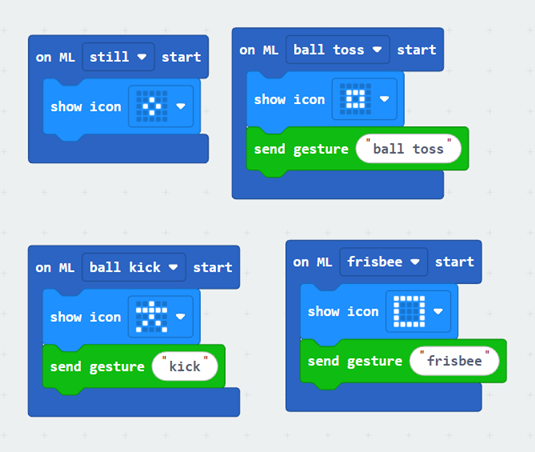
For each correct sports movement our ML model detects, it will send a message to the receiver micro:bit with the name of the movement that it has detected.
Now let's create a 1-minute timer for the AI Sports Trainer competition!
6. From the ||input:Input|| Toolbox category, drag out a ||input:on button A pressed|| and drop on the Workspace.
7. From the ||gesture_palooza:AI Gestures|| Toolbox category, drag a ||gesture_palooza:start timer|| block and drop into the ||input:on button A pressed|| block.
Your full program should look something like this:
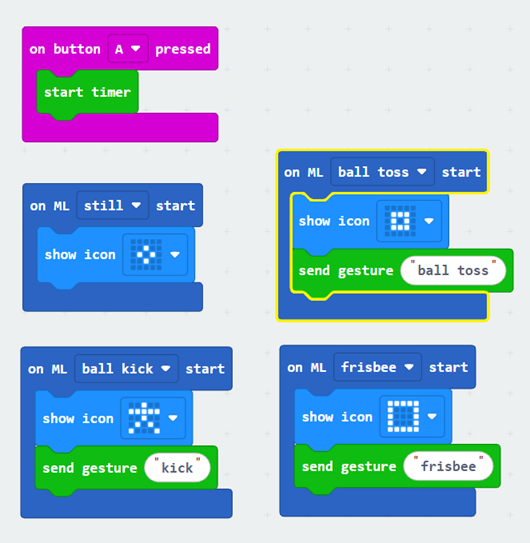
Example program - https://makecode.microbit.org/_H5gU4UL90Vkw
8. Click the purple Download button in the bottom left of the screen, and click Next.
9. Select the Same micro:bit and click Next.
10. Using the USB cable, connect your micro:bit to your computer, then click Next.
11. Click Next again, and then select the BBC micro:bit device in the browser dialog window and click Connect.
This will download your program to the micro:bit.
9. Prepare the Receiver micro:bit
To conduct the AI Sports Trainer competition, the Teacher or facilitator should download the following program onto their micro:bit.
let total = 0
let finalLog: datalogger.ColumnValue[] = []
let gesturePos = 0
let scores: number[] = []
let gestures: string[] = []
gestures = []
scores = []
input.onButtonPressed(Button.A, function () {
    gestures = []
    scores = []
    datalogger.deleteLog()
    basic.showIcon(IconNames.Yes)
    music.play(music.tonePlayable(262, music.beat(BeatFraction.Whole)), music.PlaybackMode.UntilDone)
    basic.showLeds(`
        . . . . .
        . . . . .
        . . . . .
        . . . . .
        . . . . .
        `)
})
radio.onReceivedString(function (receivedString) {
    gesturePos = gestures.indexOf(receivedString)
    if (gesturePos == -1) {
        gestures.push(receivedString)
        scores.push(1)
    } else {
        scores[gesturePos] = scores[gesturePos] + 1
    }
    basic.showLeds(`
        . . # . .
        . . # . .
        # # # # #
        . . # . .
        . . # . .
        `)
    basic.showLeds(`
        . . . . .
        . . . . .
        . . . . .
        . . . . .
        . . . . .
        `)
})
input.onButtonPressed(Button.B, function () {
    datalogger.includeTimestamp(FlashLogTimeStampFormat.None)
    finalLog = []
    total = 0
    for (let index = 0; index <= gestures.length - 1; index++) {
        finalLog.push(datalogger.createCV(gestures[index], scores[index]))
        total += scores[index]
    }
    finalLog.push(datalogger.createCV("TOTAL SCORE", total))
    datalogger.logData(finalLog)
    basic.showIcon(IconNames.Sword)
    music.play(music.tonePlayable(523, music.beat(BeatFraction.Double)), music.PlaybackMode.UntilDone)
})
https://makecode.microbit.org/_8i7535eWbE7T
10. Compete for the best AI sports trainer!
Follow the steps below to compete for the best AI sports trainer model!
- The teacher or class facilitator should have the receiver micro:bit on (either connected to a battery or USB cable).
- The teacher should press button A on the receiver micro:bit to reset (they will see a check icon appear and hear a beep).
- One at a time, each team should send their "athlete" representative to the front of the class to stand next to the teacher's micro:bit. The athlete should have their micro:bit connected to a battery pack, powered on, and secured to their body.
- The athlete should press button A to start the timer on their micro:bit (they will see a 3 second countdown along with some sounds).
- They have 1 minute to do as many sports movements as possible. Each movement that your ML model recognizes scores a point. The student should see the movement icon appear and a sound play for each correct score. And the teacher should see a + symbol appear on the receiver micro:bit.
- After the time is up, the student should see an X appear on their micro:bit along with a sound.
- The teacher should press button B on the receiver micro:bit to tally up the score
- The teacher should connect the receiver micro:bit to the computer via a USB cable, open their File Explorer, navigate to the MICROBIT drive, and double click the MY_DATA.HTM file to see the student score. Note - if the micro:bit is already connected, you many have to disconnect and reconnect to the USB cable to refresh the MY_DATA.HTM file.
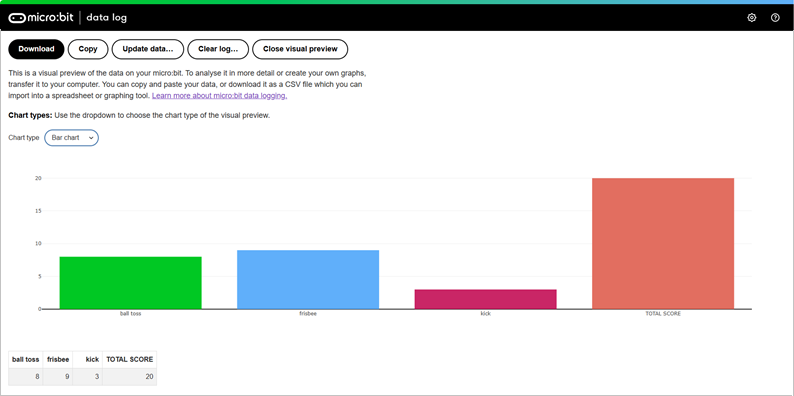
MY DATA log file
11. Reflect and extend
With their partners or as a class, students can discuss the following questions:
- Which sports movements were the easiest for the ML model to recognize? Why do you think that is?
- Could high confidence still produce an incorrect prediction?
- From your experience, how many data samples did you need for the ML model to consistently recognize the movement?
- Who was represented in the training data? How could you test more fairly?
- In your program, which decisions came from the model, and which were explicit code rules?
- How might AI gesture recognition models be used in real-life?
Possible extensions:
- Use the data logger to record specific X, Y, and Z accelerometer values for each sports movement, and use Microsoft Excel or other spreadsheet software to analyze patterns in the data.
- Use your ML model in a real sports game to see if/how trained movements correlate to actual game outcomes or performance.
Additional learning and references
datalogger

